Pages

Showing posts with label Fabric. Show all posts

Saturday, October 29, 2011

Fall-To Layout #164

I decided to make some cookies for the Team Meg dinner tonight. I decided on oatmeal chocolate chip cookies and branch out from the usual peanut butter chocolate chip cookies. Maybe then I can pretend that they are healthier because I put oats in them. I used this recipe, and they were yummy. I already had a few for quality assurance purposes. I did cut down the sugars to 3/4 cup each, but other than that, I followed the recipe.

I continued working on my inventory of fabric flowers for the holiday crafty show season. I was running low on gems to put in the center, so I experimented with putting large buttons instead and they still look cute!

Here's my take on Fall-To Layout #164. I wasn't so sure about the paper pieces that came in my ScrapbookSteals.com order, but I love them as an embellishment for this card.
Card Specs:
Embossing powder: Stampendous! in white
Embossing ink: VersaMark
Ink: Colorbox chalk ink in Ocean, Tim Holtz Distress Ink in Antique Linen
Stamps: Hero Arts- Cling Classic Fabric Design (background), Studio G (sentiment), American Crafts- Majestic
Embellishment: American Crafts Botanique Paper Pieces
Other: American Crafts Stamp Marker in Red

Meg's running in the Marine Corp Marathon tomorrow! Pictures to follow :)

Friday, October 28, 2011

One-Layer Wednesday #70

Yep, I gave in.

Gave into what, you ask? The Halloween candy? Oh, pish, I did that a long time ago.

I gave into turning on the heat in the house. Blah. I was hoping I could make it to next week to turn it on, but alas, it's just gotten uncomfortable in the house. Meh, I'll pay the money for the heat so that I can be comfortable in my own house.

Oh, yeah, and there's snow in the forecast. Before Halloween. Yep, I know, it's nuts. I hope this doesn't impact the Marine Corps Marathon on Sunday. That would really be unfortunate for Meg since she's running and for the rest of us that are cheering.

Crafty review: In the spirit of efficiency, I bought a rotary cutter to cut the fabric for my kanzashi fabric flower pins. Since I got a 30% off coupon in my email inbox the other day, I figured I could justify the cost. I ended up picking up an OLFA 28mm roatary cutter. I was looking for a Fiskars one since I was familiar with the brand, but they didn't have any at the fabric store that I went to. It works just fine and it definitely sped my fabric cutting process. I wanted to add these fabric flower pins to the inventory that I'm going to be selling this holiday season. I think it's a good idea to offer a variety. Even if one doesn't want to buy a card, perhaps they could be persuaded to buy a pin to accent their winter coat.
RJ: Another purchase that I made today was an automatic feeder. I don't want to keep depending on my parents to feed RJ when I'm gone overnight. I put some food in there already, and the cat promptly wanted to break in. I couldn't be mad at him since I'd probably do the same thing. I put one of my hand weights on the lid to keep it secure overnight. I will be both horrified and amused if he manages to get food out of there by tomorrow morning. Maybe this'll help with the 5:45 AM "I'M HUNGRY" wake up calls.

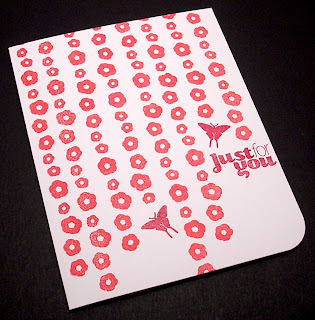
Card: Here's my take on this week's One-Layer Wednesday challenge #70: using only red and white. I grabbed two different shades of red chalk ink. I wanted the sentiment and accent butterflies to stand out against the flowers, so the darker red really helped with that.

Card Specs:
Ink: Colorbox chalk ink in Warm Red, Maroon
Stamps: American Crafts- Herbs (all)
Punch: We R Memory Keepers Corner Chomper

Monday, May 9, 2011

Dual Purpose Card

It was really nice to go to spin class tonight and work off some of the cheesecake that I consumed this weekend. :P

Tonight, I wanted to find a use for a fabric flower that I had on my desk. Initially, I was going to submit it for the CARDS challenge this week, but then when I finished the card and read the challenge more carefully, I realized that you were supposed to use the tutorial that they referenced to create the fabric flower instead of creating any fabric flower. Oops. I guess it pays to pay attention to these types of details. I used my hot glue gun to adhere some felt and a pin on the back of the fabric flower to create a brooch. Now the card can include a sentiment AND a present. Check out them multi-tasking skillz! Next time I want to try creating a similar card with a fabric flower magnet, instead of a fabric flower pin. I think the recipient might damage the card in an effort to detach the pin. There must be a better way to do this. But I think it turned out nicely for a first try. Oh, I used some mini glue dots to temporarily stick the fabric to the card so that brooch didn't wobble around.

Card Specs:
Ink: Colorbox chalk ink in Blackbird, Prussian Blue, Warm Green, Wisteria. Tim Holtz Distress Ink in Antique Linen.
Stamps: K&Company- AB Lotus Greeting Stamps (flower, butterfly), K&Company- AB Lotus Floral Stamps (leaves), Fiskars- Friendship Garden (sentiment), Stampendous (music score)
Paper: American Crafts- Merrymint
Foam adhesive: Thermoweb

Sunday, January 2, 2011

CPS #199

Well, folks. Today's the last day of winter break. Everything goes back to normal. The Christmas tree and decorations need to go back into their plastic containers. I must remember to wear business casual to work tomorrow, instead of the jeans and occasional hoodie I've been donning since December 20.

My sister is going back to school tomorrow and for her last meal at home she requested dumplings. So for about an hour this afternoon, my sister, my mom and I wrapped up dumplings for tonight's dinner. Can you tell which one I folded up? Mine's the one in the middle. Maybe my origami folding skills paid off?

Because I got some Michaels gift cards, I went there today to do some shopping. I was able to get a great deal on the pink Scotch Advanced Tape Glider (originally $39.99, but bought with 50% off coupon) and a bunch of sparkly brads to put in the center of my fabric flowers (all 50% off). As you can see in the picture below, I was very eager to use the brads. I hope the ATG gun is as awesome as everyone says it is. I went to A.C.Moore on the way home and bought some felt to put on the back of the flowers, pins to complete my fabric flower brooches (50% off), and some glue sticks for my new glue gun. My goal is to not make any more crafty purchases until February 2, one month from now. I have enough supplies to keep me pretty busy.

Below are some of the brooches that I finished making today. The flower center on the bottom right is one of the brads that I bought this afternoon. I used my Tim Holtz scissors to cut the prongs off. Those scissors have been such a great investment! All the other flower centers are buttons that I bought last Thursday. I pinned a red flower with a sparkly clear gem in the center to my black pea coat. So cute!
I tested out my new ATG gun with my card tonight. The assembly instructions were pretty easy to follow. I love how I don't have to worry about glue warping my paper and I don't have to wait for the glue to dry to continue with my project. I decided to tackle CPS #199. I used some paper that I purchased recently and a fabric flower that I made earlier today. I wanted to make a non-traditional colored valentine with no reds or pinks in the card (I'm considering the color of the fabric flower to be red-violet). Perhaps there's a non-girly girl out there that'd appreciate it.
Card Specs:
Ink: Colorbox chalk ink in Blackbird
Stamp: Studio G
Punch: We R Memory Keepers Corner Chomper, Fiskars Upper Crest border punch
Paper: American Crafts- Metropolitan and Letterbox
Other: Black Sharpie Ultra Fine Point marker
Brad: Recollections Gem Brads

Friday, December 31, 2010

Goodbye, 2010

I'm ending 2010 on a good note, and I hope that you all are too.

a. I spent most of the day making fabric flowers, paper crafting, and watching reruns of NCIS. Some of my favorite activities. I love how that black and white fabric has the illusion that it's made out of lace because of the pattern. I also tried making a pointed tip flower (vs. a rounded tip flower) and also a flower that has 6 petals instead of 5. I am becoming better friends with my new glue gun today.

b. I sold two cards from my Etsy shop today, after a 2 week drought. I was able to test out the scale that my sister gave me for Christmas. Yay, it DOES work!

c. We're having a family dinner tonight. Robyn, a friend from college, will be coming along too. I'm glad that the thought of spending NYE with my large family didn't scare her off.

d. I signed up for an 8K that's taking place in DC in March 2011. There's no turning back now! I'd better get my running in gear in the next few months!

Here's my card for today. I found a tutorial on how to make origami wreaths, and I happen to have some American Crafts scraps laying around so I decided to give this a try. I love this stamp because it covers, well, everything. I can't decide if this card is masculine or gender neutral. I suppose it could go either way. I'll have to find some Valentine's Day paper to make similar cards for Valentine's Day.
Card Specs:
Ink: Colorbox chalk ink in Charcoal
Stamp: Studio G
Punch: We R Memory Keepers Corner Chomper
Paper: American Crafts- Metropolitan
Ribbon: Spool O' Ribbon
White Gel Pen: Inkssentials

Thursday, December 30, 2010

Lunch with Jessie

I was SO happy to be able to catch up with my friend from graduate school, Jessie, over lunch today. The last time I had seen her was over the summer, so we were able to update each other on travels, house hunting/buying, and other fun adventures since the last time we talked. Then I got to go home early because the Big Boss dismissed us at 1 PM. This allowed for a nice long nap when I got home.

I was working on my kanzashi flowers, but I did take a break to fold a new origami model (a lotus) using a YouTube tutorial. The guy speaks Portuguese, so I had no idea what he was saying. Fortunately, I could tell what he was doing just by watching his hands and occasional subtitle. Yeah, so the lotus has purple leaves. That's the scrap paper that I had on hand for practice.

Tonight, I went to A.C. Moore to get a glue gun with my 50% off coupon. I also ventured to the local fabric store to see if they had any cute fabric and yep, they did! On sale too! And the few buttons that I got were on sale too. Scoooore! My favorite flower is the blue one. Third time's the charm tonight. I finally figured out about how much to cut the petals once they are on the needle.

Wednesday, December 29, 2010

Movies at the Office, Day #3

Today's feature presentation at the office was Sling Blade. Like yesterday, I was in the middle of a conference call so I had to pass on the movie. I found it ironic that even though I was the one that organized the movie marathon this year, we didn't watch any of the movies that I brought in. But that's okay. As they are MY movies, I can watch them whenever I want. :)

I didn't find a new origami model to fold, but I did find a video tutorial on how to make fabric Kanzashi flowers by folding fabric and sewing the petals together. Fortunately, Mom had some leftover fall-y fabric, so I used it as a test until I can get to the fabric store and get fabric of my own. I have to get me a hot glue gun so that I can attach buttons and embellishments to the center of the flowers without worrying that they'd fall off. This regular glue is not going to work for fabric projects. I guess we all gotta start somewhere. On another note, I found it funny that the name of the person that made the video tutorial is Tina, too.

Here was this week's One-Layer Wednesday challenge (#34): Make a one-layer card using only one image stamp and no more than two ink colors. You may also use a sentiment stamp. Hmmm, this is kinda limiting, right? I guess that's why they call it a challenge. Duh. Here's what I came up with. I went with a mini card (2.5 inch square) because the regular A2 size was kinda big and intimidating to me for this challenge. Besides, I don't do mini cards very frequently so it was nice to step outside my comfort zone. I wanted to use my new Dear Lizzy stamps somehow, so I chose a bee and a sentiment stamp from a set that Meg gave me for my birthday last year.
Card Specs:
Ink: Colorbox chalk ink in Charcoal, Yellow Cadmium
Punch: We R Memory Keepers Corner Chomper
Stamp: American Crafts- Dear Lizzy- Warbler (bee), I can't find the brand of the stamps that the sentiment comes from.